

This is the print version. Click here for the web version of this tutorial
| |
| Wilbert van Ham |
| Arvind Datadien |
| Pascal de Water |
| Authors: |
| Daniel von Rhein |
| Pascal de Water |
| Wilbert van Ham |
This course was written by Daniel von Rhein, Pascal de Water and Wilbert van Ham for the Faculty of Social Sciences of the Radboud University Nijmegen. It is an adaptation of the course written by the first two authors, for NBS Presentation for the Donders Institute.
This document is automatically generated from an online source: https://www.socsci.ru.nl/wilberth/psychopy/00intro.html
PsychoPy is a multi platform (Windows, Linux, Mac) based programming tool that allows experimenters to set up and program all sort of experiments. Along with NBS Presentation it is the recommended software for time-accurate experiments and therefore supported by the Faculty of Social Sciences' Technical Support Group (TSG).
The TSG offer (PhD) students a couple of preprogrammed experiments (i.e. templates), which can be adjusted to build up own experiments. In this way, the PhD student can efficiently program experiments fitting a technically optimal environment.
This is what this course is all about. It aims at teaching programming skills, which are needed to modify the existing templates such that they meet your own demands. Because this can be quite complex, we start with short assignments, which address one basic and simple problem at a time. They will all contribute to the final assignment in which you will work on an existing template.
Installing PsychoPy on Faculty of Social Sciences lab computers is done for you. Do not attempt to install it yourself or to make changes to an existing installation. Ask lab support for help if you need to do more than what is possible with the installed software. Lab support will make sure all monitor, sound card and interface settings are correct. Skip this installation section if you are using a lab computer.
If you have a computer maintained by ISC (beheerde werkplek) , you can select PsychoPy in the Application Catalog.
Instructions on how to install psychopy on your own computer can be found here.
If you want to use the Buttonbox or the red Joystick for your experiment, you also need to install the RuSocSci package.
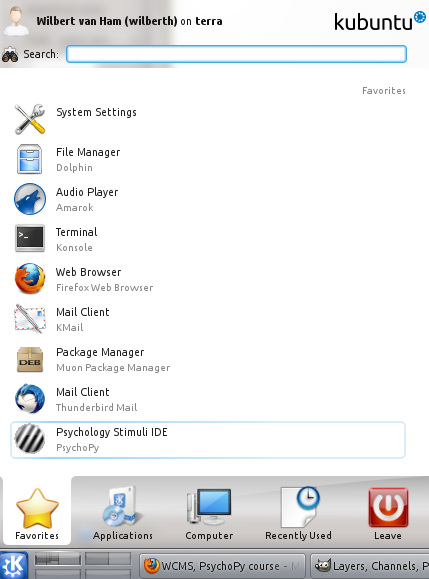
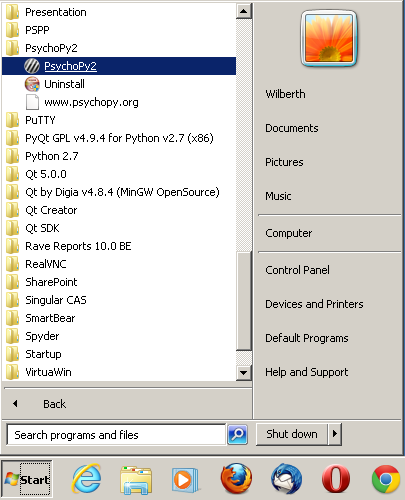
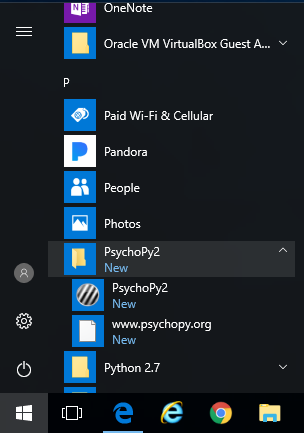
Start the PsychoPy program using whatever way you usually start programs on your system.
 |
 |
 |
Now the PsychoPy program will start. The window that we see is called the builder view.
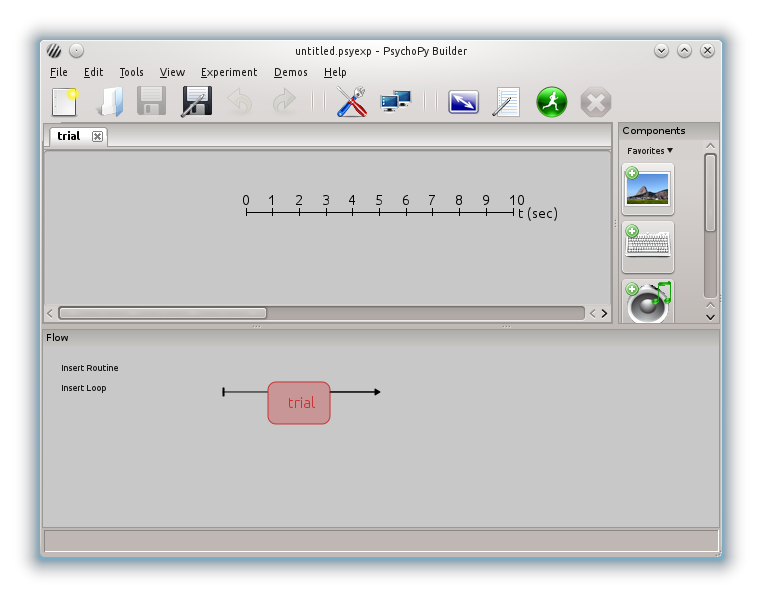
The builder is a visual programmer to make experiments in a way similar to ePrime, OpenSesame or Inquisit.
We do not use the builder. Switch to coder view with ctrl-l or with View -> Open Coder view.
The coder view is really an editor in which you can write your experiment. There is a run button on top (the button with the running man). Press it to start your experiment. You can also use your own preferred programming environment (IDE/editor). You do not need to start the PsychoPy program to start your experiment. After saving the experiment you can start it by double clicking it in Windows Explorer, Mac OS Finder, KDE Dolphin, ... We will not be using this feature in this course.
Continue with the next lesson
Donald E. Knuth: The most important thing in the programming language is the name.
We have started the PsychoPy coder environment. Let's use it. Type the examples in the coder window. Save the files somewhere on your personal network drive. Use a different folder for each lesson.
Python is a general purpose programming language. It is suitable for a large number of tasks. Programs such as the Calibre e-book library are written in Python. Python is used a lot in the academia for computational work, as an alternative for Matlab and Matlab-like environments such as Octave and Scilab. We will be using Python for stimulus presentation and response collection. It is also very suitable for data analysis, as an alternative for Spss and Gnu-R. The Python library for data analysis is called Pandas.
Since PsychoPy is built on Python, we will have to understand a bit of Python before we use PsychoPy.
Go to the coder view and type the following. Please do not copy-paste, I want you to understand every character that you type):
print("Hello World")
Press the running man button. The text Hello World appears in the Output window. Congratulations. That was a working Python program.
What did we do?
The word print refers to a function. Putting a function name in your program followed by opening and closing parentheses is called calling a function. The function is executed. This may have some side effects, ranging from showing a text in the output window (that is what the print function does) to launching a rocket. Between the parentheses there are zero or more variables. In the example above, there is one variable of the type string. Strings are used to contain texts. The text itself is between quotation marks
# the following line will show a text in the Output window
print("Hello World") # this is the line that will show a text
# this line will do nothing, it is a comment
In addition to strings, there are variables that contain numbers. There is a difference between whole numbers and real numbers. There is a special type called boolean, which can only be True or False.
print("Hello World") # string
print(123)           # integer number
print(3.14)          # real number
print(False)         # boolean False, the opposite of True
i = 17
peterSmithAge = 17.5
password = "None Shall Pass"
answer = True
In the first line of code, the variable with the name i becomes the integer number 17. In the second line peterSmithAge becomes the real number 17.5. In the third line the variable s becomes the text string None shall pass. We have to enclose text strings in quotation marks. In the last line the variable named answer receives the value True.
We have seen four data types:
Note that we always write variable with a lowercase first letter. This is not something that PsychoPy demands. It is just our convention.
Operators are things that operate on variables. Often what they do is obvious:
a = 123
b = 456
c = a + b
print(c) # output 579

s = "Hello"
t = " "
u = "World"
w = s + t + u
print(w) # output: "Hello World"
Which will print 579 and Hello World.
Most often you will be able to gues what an operator does. The operators +, -, *, / have their usual meaning.
import math
y = math.cos(0.0)
print(y)
In the next chapter we will import the PsychoPy module and make our first stimulus.
Continue with the next lesson
Donald E. Knuth: The computer will often say that you are wrong. But do not worry. It is not angry with you.
In this chapter we will explain your very first PsychoPy experiment line by line.
Experiments in PsychoPy are really computer programs written in the Python programming language. To make sure that the computer understands this and understands which parts of PsychoPy to make available, we must start our experiment with a header.
#!/usr/bin/env python
# -*- coding: utf-8 -*-
# The first line is called the hash bang. It helps operating systems
# understand what to do with this script. The second line describes
# the encoding of this file. UTF-8 is the only one used nowadays.
# It supports all alphabeths, even runes and linear B.

# Import the PsychoPy libraries that you want to use
from psychopy import core, visual
The very first line will tell operating systems that observe the POSIX convention that this computer program is using the Python language. The line starts with a # but is not a comment.
The second line, which is also not a comment, allows us to use characters that are not in the limited ASCII set, such as the € character.
The last line imports the submodules core and visual from the PsychoPy module. PsychoPy consists of 20 submodules. They are well documented: API documentation: http://www.psychopy.org/api/api.html
For most experiments, we want to present visual or acoustic stimuli or a combination of both. It is also possible to present videos, although this topic is outside the scope of this course. Thus, what we need to do is to define visual and acoustic stimuli.
For a visual stimulus, we have a Window on which we present stimuli. This window can be a full screen, a window with borders around it, or a videowall the size of a football stadium. On this window we present some stimulus, for instance a text stimulus that says Hello World! In PsychoPy a visual stimulus definition looks like this:
# Create a window
win = visual.Window([400,300], monitor="testMonitor")

# Create a stimulus for a certain window
message = visual.TextStim(win, text="Hello World!")
As we can see, our window has the name win, it is 400 pixels wide and 300 pixels high. Our visual stimulus has the name message. it defines, what our stimulus consists of. In this case, it consists of the text Hello World!
Two more steps are required to present our stimulus on the screen.
# Draw the stimulus to the window.
message.draw()

# Flip backside of the window.
win.flip()

# Pause 5 s, so you get a chance to see it!
core.wait(5.0)
First we draw message on its window back buffer, then we flip the back and front buffer. The flipping is the moment that the text is really presented.
The function flip() puts the picture immediately on the screen. We would see it appearing, however, it wouldn’t stay there for long (just for a fraction of a second). We explicitly have to tell the program to keep on running without doing anything. Another built-in function doing exactly that is core.wait(). It keeps the program as it is and waits for the amount of time (in seconds) we command to wait.
Finally we close the window and close the experiment.
# Close the window
win.close()

# Close PsychoPy
core.quit()
Lets put it all together. Type this experiment into PsychoPy (you can leave out the comments if you want) and run it.
#!/usr/bin/env python
# -*- coding: utf-8 -*-
# The first line is called the hash bang. It helps operating systems
# understand what to do with this script. The second line describes
# the encoding of this file. UTF-8 is the only one used nowadays.
# It supports all alphabeths, even runes and linear B.

# Import the PsychoPy libraries that you want to use
from psychopy import core, visual

# Create a window
win = visual.Window([400,300], monitor="testMonitor")

# Create a stimulus for a certain window
message = visual.TextStim(win, text="Hello World!")

# Draw the stimulus to the window. We always draw at the back buffer of the window.
message.draw()

# Flip back buffer and front  buffer of the window.
win.flip()

# Pause 5 s, so you get a chance to see it!
core.wait(5.0)

# Close the window
win.close()

# Close PsychoPy
core.quit()
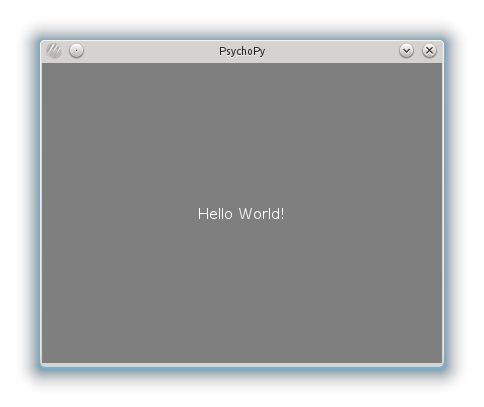
It should give you the following stimulus:
Continue with the next lesson
That went pretty quick. We have written our first experiment in PsychoPy and it works. As is always the case, we will need some background knowledge before we can continue with more complex experiments. This lesson is about programming: lists and control statements.
presentationTime = [3.5, 5.5, 7.5]
presentationText = ["Apple", "Spam", "Ham"]
In the first example, presentationTime consists of three elements of the type real number. To address an individual element in it, you have to write the elements index in square brackets straight after the variable name. For example, to obtain the first value, you would need to use the first of the following commands, for the last value, you would need the second one:
firstValue = presentationTime[0]
lastValue = presentationTime[2]
You do not need to know all values in your list when you start. You can even start with an empty list:
responseTime = []
responseTime.append(3.5)
responseTime.append(5.5)
responseTime.append(7.5)
The above example will put the same values in responseTime as there are in presentationTime.
List are not restricted to one dimension. For example, if you want to save values from a table in an list you could also add an extra dimension to the list:
trialResponseTime = []
trialResponseTime.append([2.5, 3.5])
trialResponseTime.append([12.5, 13.5])
trialResponseTime.append([22.5, 23.5])
print(trialResponseTime)
Note that what we really did was making a list of lists. The last line shows us the result.
In Python, you can use control statements to alter the sequence of your program. This is necessary to make your program flexible. In the following paragraphs, three types of control statements will be discussed: for, while and if else.
In Python, blocks of instructions that belong together are formed by indentation level. There are no begin or end keywords to show where the block begins or ends. The computer will simply count the number of spaces or tabs at the start of the line to know where the block begins or ends.
For looping over a list, it is easiest to use the for statement. It nicely iterates over the elements
stimuli = ["Apple", "Banana", "Orange", "Dead Parrot"]
for stimulus in stimuli:
	message = visual.TextStim(win, text=stimulus)
	message.draw()
	win.flip()
	core.wait(1.0)
Sometimes you need the index that points to the element as well as the element itself. That is possible too:
stimuli = ["spam", "ham", "more spam", "even more spam"]
for i, stimulus in enumerate(stimuli):
	message = visual.TextStim(win, text=str(i)+": "+stimulus)
	message.draw()
	win.flip()
	core.wait(1.0)
You could have used the for statement without a list. Use for i in range(10): and whatever is inside the loop will simply be executed ten times.
Sometimes you do not know in advance the number of times that the loop must be executed. Use the while-statement then. Make sure you make it possible to exit the loop. Otherwise we speak of an infinite loop. In Python, while-statement contains two parts:
As a partial example, here is a loop counting every second for ever:
i = 0
c = None
while c==None:   # loop until a key is pressed
	message = visual.TextStim(win, text=str(i)+" press a key")
	message.draw()
	win.flip()
	c = event.waitKeys(maxWait=1.0)
	i = i + 1
Note that we need str() to convert the integer number i to a text string. The event module is only available after you import it with 'from psychopy import event'.
Often, it is important to let a program do things differently, depending on the value of a variable. For example, if a variable has a positive value, the program has to react differently than when it is negative.
if someVariable > 0:
	# do something
else:
	# do something different
In Python, the if-else-statement is used to manage choices whether to do something at a certain point, or to do something else. The choice is always made on basis of an evaluation within the statement. Possible evaluations are as follows:
x == y # (x is equal to y)
x != y # (x is not equal to y)
x > y # (x is greater than y)
x <= y # (x is less than or equal to y)
x >= y # (x is greater than or equal to y)
The following partial example code evaluates whether a student has passed an exam. If students receive a mark higher than or equal to 5.5 he has passed the test:
if result >= 5.5:
	message = visual.TextStim(win, text="pass")
else:
	message = visual.TextStim(win, text="fail")
It is also possible to use the if-part without a following else-part. Here an example:
if temperature < 0:
	message = visual.TextStim(win, text="Frozen\ncold")
In this example the \n refers to a next line or a enter.
Each if-statement is actually a logical test. If the test is true, then the following line of code is executed. If the test is false, then the statement following the ‘else’ is executed (if present). After this, the rest of the program continues as normal.
Sometimes, we wish to make a choice out of several conditions. The most general way of doing this is by using the else if variant of the if-statement. This works by cascading several comparisons. As soon as one of these tests gives the result True, the following code is executed, and no further test is performed. In the following example grades are awarded depending on the result of an exam:
if result >= 7.5:
	message = visual.TextStim(win, text="Pass: Grade A")
elif result >= 6.0:
	message = visual.TextStim(win, text="Pass: Grade B")
elif result >= 5.5:
	message = visual.TextStim(win, text="Pass: Grade C")
else:
	message = visual.TextStim(win, text="Fail")
As you have just read, Python works with variables and control structures. Both things are commonly combined, for example a loop that runs through all elements of a list. Or think of visual feedback, which depends on the value of a certain variable. Now, we will make a short program consisting of a list.
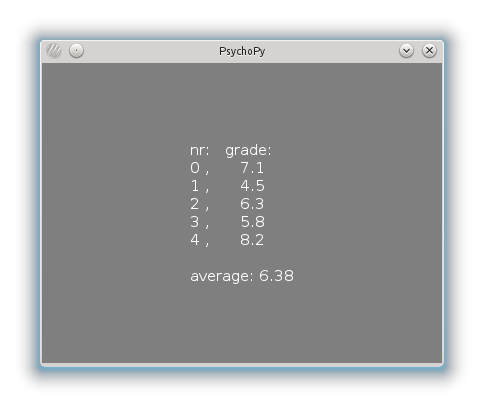
#!/usr/bin/env python
# -*- coding: utf-8 -*-
# A PsychoPy experiment is now divided in three sections. In the
# Setup section we read files and open windows. These things are slow
# and therefore should not be done while the experiment is running.
# in the Experiment section we do the actual presenting of stimuli
# en in the Closing section we do what has to be done after the
# experiment if finished.

## Setup Section
from psychopy import core, visual

win = visual.Window([400,300], monitor="testMonitor")

# The following block of code prepares a text stimulus called message
# a string variable contains text, it must be enclosed in quotation marks
myText = "nr:   grade:\n"
# a list variable contains a number of variables
grades = [7.1, 4.5, 6.3, 5.8, 8.2]
# do something for every item in the list
for studentNumber, grade in enumerate(grades):
	# extend the text with one line, "\n" tells PsychoPy to start en new line
	myText += str(studentNumber) + " ,      " + str(grade) + "\n"

# write myText to a TextStim object called message and draw this to the window
message = visual.TextStim(win, text=myText)
message.draw()

## Experiment Section
win.flip()
core.wait(5.0)

## Closing Section
win.close()
core.quit()
It should give you the following screen:
Continue with the next lesson
In assignment 3 we used a number of functions. For instance the sum() function was used to return the sum of the variables in a list and the len() function was used to return the length of the list. These functions are always available.
We already saw that most functions are not always available. Before we we could use the sine function we had to to import the math module with import math and call the sine function using math.sin(). PsychoPy has 17 such modules which you can use.
We also used a third type of function. This type of function works on an object. message.draw() for instance draws a message and win.flip() flips the window buffers. These objects are a special kind of variable, that we had to make before we could use them:
# next line makes a Window object
win = visual.Window([400,300], monitor="testMonitor")

# next line makes a TextStim object
message = visual.TextStim(win, text=myText)
message.draw()
Note that the special functions that return objects always have names that start with an upper case letter. (we will occasionally see an exception to this rule, but the reason behind this is beyond the scope of this course)
Look at the reference manual to see what the 17 modules do.
Continue with the next lesson
With all knowledge from previous chapters, we can write an experiment, but it as experiments get larger, the lack of structure may become problematic. When programming PsychoPy, it is often the case that a certain sequence of operations, is put together, forming a little coherent part. Such a sequence can have a form like
When put together, such a part is called a function and it forms the core of Python programming. You can build your whole experiment from these little functions, because they can be accessed anywhere in your Python code, or within another function, via a function call, using the name of the function. This makes your code easily readable and very flexible. A function consists of:
Here is an example of a function:
def showText(window, myText):
	message = visual.TextStim(window, text=myText)
	message.draw()
	window.flip()
Let us examine the details of this function. The function header starts with the reserved word def (for define) and followed by the function name. After that you can see parentheses containing variables you want to pass to the function, the so-called arguments. Each argument is separated from the next by a comma. A function can also be defined without argument, then the parentheses contain nothing. The example functon above does not contain a return statement.
The body of the function is the indented part and end when the indent stops. All indented statements will be executed when the function is called. Any variable declared here will be treated as local to the function. That means that the variable does not exist outside the function body (the indented text). The function described above can be called in PsychoPy by the following code.
win = visual.Window([400,300], monitor="testMonitor")
showText (win, "Hello World")
It seems like a useless function, but when something has to be printed several times, for instance, when computing a list, it can become very useful. Let's take another function, which can calculate square values of integers (math) returning this value. It is important to ensure that your arguments have the expected type (number, string, list). Otherwise the function will produce strange results or errors. The return statements causes the function to return the desired result.
def calculateSquare(number):
	return number * number
#!/usr/bin/env python
# -*- coding: utf-8 -*-
# There is little experiment if the participant cannot give any input.
# Here we changed assignment 2 a bit so that it waits for a keys, rather
# than waiting 5 s. Note that we need to import the event module from
# PsychoPy to make this work.
from psychopy import core, visual, event

## Setup Section
win = visual.Window([400,300], monitor="testMonitor")
textString = "Press any key to continue\n"
message = visual.TextStim(win, text=textString)

## Experiment Section
message.draw()
win.flip()
c = event.waitKeys() # read a character
message = visual.TextStim(win, text=textString + c[0])
message.draw()
win.flip()
event.waitKeys()

## Closing Section
win.close()
core.quit()
Continue with the next lesson
In the last assignment you have learned to make a function with an argument. The text string sent to the function was used to define the question it showed. This was done from the main program. But, functions can also be called from within another function.
By this, all individual functions created for your experiment can be seen as building blocks forming your experiment. As we progress in programming our experiment and the code and number of functions increase, we need to organize the code. We can for example take all functions out of the main program file and make a separate function file for them. Let's call this file amalia.py. Replace amalia with your own name. Make sure the file name is unique. This file name will be the name of the module containing the functions. Best is to choose a name that describes the functions contained in the file. math.py is a very nice name for a file containing math functions for instance. By doing this, we get a nicely structured experiment, allowing us to keep overview. Since we do not know yet what will be in the file, it is ok to use your first name. However, do not do that again in the future. Files and modules should have meaningful names.
Let's make a file that contains just one function. One that you can call at any moment and that prints the time to your Output window and the message that you give to it. Note how the format function can be used to string together the hours, the minutes and the seconds. The format function has many option. You can look them up in the manual: http://docs.python.org/2/library/string.html (which admittedly is a bit hard to read since the function has so many options). You can for instance do "{}-{}-{}".format(day, month, year) to format a date if you have three numbers or use "{:.2f}".format(3.141592) to limit the number of decimals of pi to two.
#!/usr/bin/env python
# -*- coding: utf-8 -*-
# My functions.

from psychopy import core, visual, event
import math, time

## Function section
def debugLog(text):
	tSinceMidnight = time.time() % 86400
	tSinceWholeHour = tSinceMidnight % 3600
	minutes = tSinceWholeHour / 60
	hours = tSinceMidnight / 3600
	seconds = tSinceMidnight % 60
	print("log {:02d}:{:02d}:{:f}: {}".format(int(hours), int(minutes), seconds, text))
Save this file as amalia.py, or whatever your first name is.
For sure, PsychoPy needs to know where to search for the variables and subroutines. Therefore, a link has to
be made. The command import is the instruction we need to use the contents of another file. We use the import
statement as follows:
#!/usr/bin/env python
# -*- coding: utf-8 -*-
from psychopy import core, visual, event
import time
import amalia

## Setup Section
win = visual.Window([400,300], fullscr=True, monitor="testMonitor")

## Experiment Section
for i in range(10):
	core.wait(1.000)
	win.flip()
	amalia.debugLog(i)

## Closing Section
win.close()
core.quit()
We made a module for you with a few more useful functions. Please download it, import it and use it in the assignments from now on. It is called my.py and can therefore be imported with import my. Note that it has the most dreadful name possible. Make sure you use meaningful names in the future.
Continue with the next lesson
So far, we have focused on stimuli presentation and responding to these stimuli. We let PsychoPy create the stimuli and put the results on the screen. But we need to record the data in external data files and sometimes we have already existing stimuli lists, we want to use for our experiment. For these functions we need data import and export.
For exporting data we can use the PsychoPy experiment handler or the underlying Python file handling system. We choose the second since it is simpler to use and offers more freedom.
#!/usr/bin/env python
import csv

## Experiment Section, collect data here
data = [1, 0, 1, 1, 1, 0, 0, 1, 1]

## Closing Section
datafile = open("data.csv", "wb")
writer = csv.writer(datafile, delimiter=";")
for i, row in enumerate(data):
	writer.writerow([i, row])
datafile.close()
Saving data in Python works in two steps. What you have to do first is to define an output file where Python can direct output to. You do this by using the open() function. Second, you have to make a csv.writer that send your list of data to the output file every time you want to write to it. The term csv stand for comma separated value. It can really do more that just that, but we will see about that in the exercise.
For open(), you need the file name (i.e. how to call the file on the hard disk) as argument and a second argument that describes how to open the file. We use "wb" for writing en "rb" for reading. There are two more functions needed, writerow() and close(). With writerow() from csv.writer object you add a line of comma separated values to your output file on the hard disk, with close() from the file object, you close your file.
Importing or reading in data is almost as easy as exporting and works in a comparable manner. Imagine you want to present a square of a certain size and color on the screen. The experiment consists of four trials, but this could be a different set of trials for different groups of testees. Let's says that you have a file for each experiment and these files have one line for each trial. The value in the first column is the size of the square and the value in the second column is the time it should be on the screen. The columns are separated by a semicolon:
3.3;"red"
1.1;"green"
4.4;"red"
2.2;"green"
The experiment code code look like his:
#!/usr/bin/env python
import csv

## Setup section, read experiment variables size and color from file
size = []
color = []
datafile = open("stimuli.csv", "rb")
reader = csv.reader(datafile, delimiter=";")
for row in reader:
	size.append(float(row[0]))
	color.append(row[1])
datafile.close()

## Experiment Section, use experiment variables here
for trial in range(len(size)):
	print("size = {}, color = {}".format(size[trial], color[trial]))
First we make the empty lists to store size and color of the stimulus. Then we make a file object and connect it to a csvreader. The reader wants to know the precise format of the file, such as the delimiter used. Then we read every line of the file. The first field is appended to the list of sizes. The second row to the list of colors. This example does not show a real experiment section. It just prints the values to the PsychoPy output in the bottom of your window.
You do not need the csv.reader directly in your experiment. my.py as given in the previous lesson contains functions that can do this for you.
#!/usr/bin/env python
# -*- coding: utf-8 -*-

from psychopy import core, visual, event
import csv

## Setup section, read experiment variables from file
win = visual.Window([400,300], monitor="testMonitor", units="cm", fullscr=False)
stimuli = []
datafile = open("redgreen_stimuli.csv", "rb")
reader = csv.reader(datafile, delimiter=";")
for row in reader:
	if len(row)==2:         # ignore empty and incomplete lines
		size = float(row[0])  # the first element in the row converted to a floating point number
		color = row[1]        # the second element in the row
		stimulus = visual.Rect(win, width=size, height=size)
		stimulus.fillColor = color
		stimuli.append(stimulus)
datafile.close()

## Experiment Section, use experiment variables here
for stimulus in stimuli:
	stimulus.draw()
	win.flip()
	core.wait(1.000)

## Closing Section
win.close()
core.quit()
Microsoft Excel uses the List separator from the Region and Language settings as delimiter when saving a csv-file, even though in the Save File dialog it says CSV (Comma delimited) (*.csv). This is a long standing problem in Microsoft Excel that especially affects European users, since in European version of Microsoft Windows the standard list separator is set to semi-colon (;). Since the interpretation of the comma (and the period) as decimal marker (and therefore not as list separator) is considered standard in the ISO 80 000 International System (pdf 5.3.4) we assume in this tutorial that the list separator is set to semi-colon.
Unlike most other programs, Microsoft Excel does not support the UTF-8 character set in csv-files. Keep in mind that you cannot use non-ascii characters (χαρακτήρες) if you make your experiment file in Excel.
Continue with the next lesson
Computer screens are updated according to their refresh rate. What happens then is that the whole screen is redrawn line by line all the time. For example, with a refresh rate of 60 Hz, the screen is redrawn 60 times per second (1000 ms) and the duration it takes to redraw it line by line is 16.67 ms (1000/60). The following video shows what it looks like:
When attempting to redraw the screen while it is currently already being updated (the lines are drawn) the result might lead to artifacts, since the update occurs immediately, leading to parts of both, the new and and the old screen content, being visible. The following image shows what happens if an image is updated twice while it is drawn to the screen:
What is even worse is that you will never know in which phase of the redrawing the new redraw was started. Thus, you cannot be sure when exactly the new content is fully visible on screen. The first step towards getting around this problem is to synchronize the actual redraw to the vertical retrace of the screen. This means that a change in content will never happen immediately, but always only when the retrace is at the top left position. When synchronizing to the vertical retrace, the graphics card is told to update the screen the next time it starts redrawing the first line. While this will solve the problem of artifacts, you will still face the problem of not knowing when exactly something was visible on the screen, since the graphic card handles this synchronization itself in the background.
PsychoPy solves this problem with the .flip() function. It allows waiting for the vertical retrace to actually happen before proceeding with the code that tells the graphic card to update the screen (this is also known as blocking on the vertical retrace). This means that whenever something should be presented on screen, no matter in which line the redraw is at this point in time, the graphic card will wait for the redraw to be in the first line and then present the stimulus. Since the code is blocking, the time presentation reports the stimulus to be presented on screen will always be the time when the redraw is starting at the first line.
It is important to switch off power saving schemes of your graphic card"s driver, and use a special graphical card provided by your technical support!
Warning, this example does not work on ISC computers. Try it in the lab or on your private computer
To play back audio you have to create an sound object from the sound module:
#!/usr/bin/env python
from psychopy import core, sound
s = sound.Sound(value="C", secs=0.5)

s.play()
core.wait(4.0)

core.quit()
The play() function of auditory stimuli will return immediately. Therefore the experiment has to do a bit of waiting after calling the play function. You can also ask for input or do other things after calling the play function. Just make sure the experiment does not end there, because then you will not hear the sound.
Since the audio stream has to be sent to the hardware, there will still be a delay before the audio can be heard. Unfortunately, the latency of the sound onset is not 0 ms. However, it is assumed to be relatively stable over time. Tests results around 5 ms. And again use a special sound card provided by your technical support!
The sound object has many more options. It can play a tone, a complete stereo waveform or audio files.
In order to keep track of the desired timing of your experiment, it might be useful to visualize it by drawing a time line. A time line gives a nice overview how your experiment is build up and when and what has to happen. It is advised to draw a timeline of the experiment before you start to program. In this manner you can decompose your program into event pieces and start programming these step by step (or bit by bit ;-).
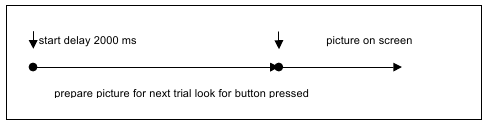
In this example you start with creating a delay. Then you prepare your picture. When a button is pressed, the picture occurs on your screen. Programming done!
#!/usr/bin/env python
# -*- coding: utf-8 -*-

from psychopy import core, visual, event
import csv, random, time

## Setup Section
win = visual.Window([800,600], fullscr=False, monitor="testMonitor", units="cm")

# turn the text strings into stimuli
textStimuli = []
for iTrial in range(10):
	# append this stimulus to the list of prepared stimuli
	text = "number: {}".format(iTrial)
	textStimuli.append(visual.TextStim(win, text=text))

# make a question stimulus
questionStimulus = visual.TextStim(win, text="Was this number larger than 4?")

# fixation cross
fixation = visual.ShapeStim(win,
	vertices=((0, -0.5), (0, 0.5), (0,0), (-0.5,0), (0.5, 0)),
	lineWidth=5,
	closeShape=False,
	lineColor="white"
)

# open data output file
datafile = open("/tmp/datafile.csv", "wb")
# connect it with a csv writer
writer = csv.writer(datafile, delimiter=";")
# create output file header
writer.writerow([
	"number",
	"response",
	"responseTime",
	])


## Experiment Section
n = len(textStimuli)
for i in random.sample(range(n), n):
	# present fixation
	fixation.draw()
	win.flip()
	core.wait(0.980) # note how the real time will be very close to a multiple of the refresh time

	# present stimulus text and wait a maximum of 2 second for a response
	textStimuli[i].draw()
	win.flip()
	textTime = time.time()
	wait = random.uniform(0.100, 0.500)
	core.wait(wait)

	# ask wheter the number was larger than 4
	questionStimulus.draw()
	win.flip()
	key = event.waitKeys(2.000, ["y","n", "escape"])
	responseTime = time.time()

	# write result to data file
	if key==None:
		key=[]
		key.append("no key")

	writer.writerow([
		i,
		key[0],
		"{:.3f}".format(responseTime - textTime),
		])

	if key[0]=="escape":
		break
datafile.close()

## Closing Section
win.close()
core.quit()
Continue with the next lesson
It is time for the grande finale: the final assignment. We prepared for you a template with example functions, code snippets and useful comments. It contains the examples from this course and much more. You can use these functions from the template directly or you can copy them into your own experiment and change them. It often makes sense to change the name of the function if you change it's behaviour. Look in lesson 6 to see how to use the functions directly.
As final assignment you will write an experiment.
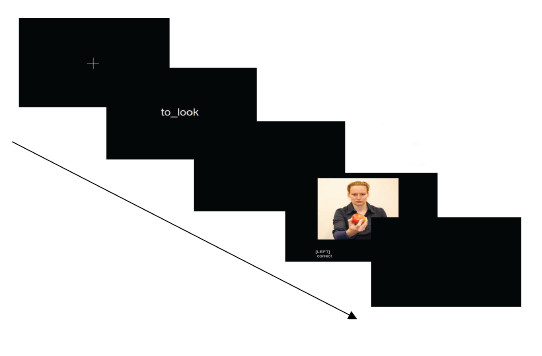
We present a text which serves as prime. Then we show an action picture. The participant must indicate wether the prime matches the action or not. There are both plausible and implausible actions. Will there be a faster reaction for plausible actions? Will there be a faster reaction for matching primes?
You will need these files:
A single trial should consist of the following parts. Please do not start programming yet. Read till the end of the tutorial first

Let us now write an entire experiment from scratch. Feel free to do this any way that works for you. The experiment need not do exactly what is described here. Feel free to add additional fancy things or make it do things that you can use for your own work. Just make sure that at least all the elements described here are present
The way I am going to describe how to build this experiment is called bottom up. We are going to start from a minimum running experiment and add things from there. After each line in this instruction your experiment should be able to run. Use this. Test your experiment after each feature that you add. Finding a bug is easy if you added it two minutes ago, it is hard if you added it half an hour ago.
First look at the example in template.py and make it run. Do not use it as a starting point to wrote your own experiment. Just keep it as a reference on how to do things.
You need not follow the detailed steps below, but it may be handy.
You can add a lot more. Feel free to make the experiment more realistic. Feel free to add things that you would use yourself in an experiment. Feel free to go home if you have had enough Python. The following suggestions are just suggestions.
Add a pause option, a feedback sound. Prevent consecutive trials with the same image, the same prime. Add instructions. Psychopy has a nice way to let people enter the participant number. It is in the gui module. Did you use it?
This was the final assignment. I hope you liked this introduction to Python and found it useful.
Please take a stopwatch (a real one). Start it, and stop it at 1.00 s. Start again and stop at 2.00 s. Try it a number of times. Estimate how far your deviation from the integer second is. The author of this tutorial can do it with a standard deviation of about 0.02 s, but many people are much better than that.
The fact that human reaction times (or reaction precisions, or whatever you wish to call them) are in the region of 20 ms means that in order for us to measure them we will need a computer that is an order of magnitude faster. If I want to measure the difference between a slow person who reacts in 20 ms and a quick person who reacts in 10 ms it is useless to have a computer that cannot see the difference between the two.
Unfortunately computers are not as fast as they seem. A typical computer keyboard will take about 30 ms to send a keypress to the computer. This means that if you measure times that are in the order of 1 second and have a σ of 0.1 s you will have a systematical error in your μ measurement of 3%, an additional random error in each measurement of 3% and a granularity (coarseness) that completely ruins the measurement of σ. Reaction times are often much faster than this, making the problem even larger.
Fortunately the Faculty's Technical Support Group has a solution: the buttonbox.
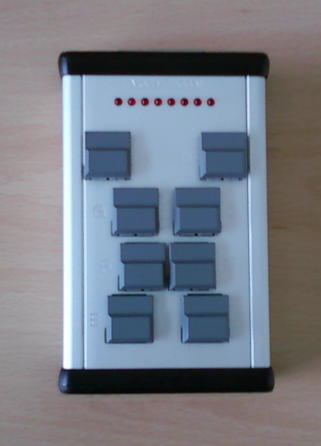
The buttonbox has a reaction time of 1 ms, reducing your problem with a factor of 30 (and the square of that for σ). It also has a few LED's that are just as fast, solving all your problems with display timing. It can play sounds and react to them, it can interface with other devices and it can write your PhD thesis for you. (Only one of the claims in the previous sentence is not true)
The buttonbox talks to your computer over a USB-cable of the same type that you use for connecting your printer or mobile phone. If you are using an old buttonbox that is connected with a serial cable, please stop reading and go to the next chapter, since this experiment will not works for you.
The buttonbox connects to the computer using the BITSI protocol. Older versions but there is no need for you to use this protocol directly. Use the functions from the RuSocSci package:
#!/usr/bin/env python
## Setup Section
from psychopy import core, visual, event
from rusocsci import buttonbox
win = visual.Window([400,300], monitor="testMonitor")
bb = buttonbox.Buttonbox()

## Experiment Section
bb.waitButtons(maxWait = 10.0, buttonList=['A'])

## Cleanup Section
core.quit()
Note that this is almost identical to the same experiment using a keyboard. All you have to do is replace the waitKeys() function from the event module with the waitButtons() function from the buttonbox module
It is even better than that. If there is no buttonbox connected the waitButtons() function will simply use the input from the keyboard. This way you can develop and test your experiment at home and run it in the lab without changing as much as one line of code.
The buttonbox sends a 'A' when the first key is pressed and a 'a' when the first key is released. Do not forget about the difference en make use of it. The time between the two is a measure for the way people are typing.
#!/usr/bin/env python
# -*- coding: utf8 -*-
from psychopy import visual, event, data, logging
import random, datetime, time

## Setup section
# experiment specific
#win = visual.Window([400,400], units='height', winType='pyglet', fullscr=True)
win = visual.Window([400,400], units='height', winType='pyglet')
width = float(win.size[0])/win.size[1] # actual width in units of height
logging.console.setLevel(logging.WARNING) # default, only Errors and Warnings are shown on the console
# run  specific
fileName = "data/simon"+datetime.datetime.now().strftime("%Y-%m-%dT%H_%M_%S")+".dat"
dataFile = open(fileName, 'w') # note that MS Excel has only ASCII .csv, other spreadsheets do support UTF-8
dataFile.write("#{}, {}, {}\n".format("position", "time", "response"))


instruction = visual.TextStim(win,
		text='Press ← if you see a rectangle left of the fixation cross. '\
		'Press → if you see one on the right. Press Escape to stop the '\
		'experiment, or continue to the end. It takes about a minute.'.decode("utf-8")
	)
# fixation cross
fixation = visual.ShapeStim(win,
		vertices=((0, -3), (0, 3), (0,0), (-3,0), (3, 0)),
		lineWidth=10,
		size=.01,
		closeShape=False,
		lineColor='blue'
	)

# stimulus rectangle
stimulus = visual.Rect(win,
		width     = 0.1,
		height    = 0.1,
		fillColor = 'red',
		lineColor = 'red'
	)

## Experiment section
for i in range(50):
	# fixation
	fixation.draw()
	win.flip()
	presses = event.waitKeys(1.0)
	if presses and presses[0] == 'escape':
		break

	# stimulus
	x = -(width-0.1)/2 +(width-0.1)*random.random()
	stimulus.setPos((x, 0))
	stimulus.draw()
	win.flip()
	timeBefore = time.time()
	presses = event.waitKeys(3) # wait a maximum of 3 seconds for keyboard input
	timeAfter = time.time()

	#handle keypress
	if not presses:
		# no keypress
		print "none"
		p = 0
	elif presses[0]=="left":
		p = -1
	elif presses[0]=="right":
		p = 1
	elif presses[0]=="escape":
		break
	else:
		# some other keypress
		print "other"
		p = 0
	dataFile.write("{}, {}, {}\n".format(x, timeAfter-timeBefore, p))
	#print x, timeAfter-timeBefore, p

## Cleanup section
win.close()
core.quit()
Continue with the next lesson