Programming with PsychoPy, 3 Programming lists and control structures
That went pretty quick. We have written our first experiment in PsychoPy and it works. As is always the case, we will need some background knowledge before we can continue with more complex experiments. This lesson is about programming: lists and control statements.
Lists
An important object in Python is a list. A list is a collection of values, most often of the same type. The easiest way to visualize a list is to imagine a list as a table that contains only one row with one or (almost always) more columns. Each column contains a value, and a program can use the number of each column to access the value in it. The number of such a column is referred to as the index of that array. In Python, the index begins with the integer 0 and is always written inside squared brackets. A list is also a variable. It is made (or declared) the following way:presentationTime = [3.5, 5.5, 7.5] presentationText = ["Apple", "Spam", "Ham"]
In the first example, presentationTime consists of three elements of the type real number. To address an individual element in it, you have to write the elements index in square brackets straight after the variable name. For example, to obtain the first value, you would need to use the first of the following commands, for the last value, you would need the second one:
firstValue = presentationTime[0]
lastValue = presentationTime[2]
You do not need to know all values in your list when you start. You can even start with an empty list:
responseTime = []
responseTime.append(3.5)
responseTime.append(5.5)
responseTime.append(7.5)
The above example will put the same values in responseTime as there are in presentationTime.
List are not restricted to one dimension. For example, if you want to save values from a table in an list you could also add an extra dimension to the list:
trialResponseTime = []
trialResponseTime.append([2.5, 3.5])
trialResponseTime.append([12.5, 13.5])
trialResponseTime.append([22.5, 23.5])
print(trialResponseTime)
Note that what we really did was making a list of lists. The last line shows us the result.
Control Statements
In Python, you can use control statements to alter the sequence of your program. This is necessary to make your program flexible. In the following paragraphs, three types of control statements will be discussed: for, while and if else.
In Python, blocks of instructions that belong together are formed by indentation level. There are no begin or end keywords to show where the block begins or ends. The computer will simply count the number of spaces or tabs at the start of the line to know where the block begins or ends.
The for-statement
For looping over a list, it is easiest to use the for statement. It nicely iterates over the elements
stimuli = ["Apple", "Banana", "Orange", "Dead Parrot"]
for stimulus in stimuli:
	message = visual.TextStim(win, text=stimulus)
	message.draw()
	win.flip()
	core.wait(1.0)
Sometimes you need the index that points to the element as well as the element itself. That is possible too:
stimuli = ["spam", "ham", "more spam", "even more spam"]
for i, stimulus in enumerate(stimuli):
	message = visual.TextStim(win, text=str(i)+": "+stimulus)
	message.draw()
	win.flip()
	core.wait(1.0)
You could have used the for statement without a list. Use for i in range(10): and whatever is inside the loop will simply be executed ten times.
The while-statement
Sometimes you do not know in advance the number of times that the loop must be executed. Use the while-statement then. Make sure you make it possible to exit the loop. Otherwise we speak of an infinite loop. In Python, while-statement contains two parts:
- The condition indicates what must be true for the loop to continue.
- The indented part is the body of the loop. All the code that is indented will be repeated.
As a partial example, here is a loop counting every second for ever:
i = 0
c = None
while c==None:   # loop until a key is pressed
	message = visual.TextStim(win, text=str(i)+" press a key")
	message.draw()
	win.flip()
	c = event.waitKeys(maxWait=1.0)
	i = i + 1
Note that we need str() to convert the integer number i to a text string. The event module is only available after you import it with 'from psychopy import event'.
The if-else-statement
Often, it is important to let a program do things differently, depending on the value of a variable. For example, if a variable has a positive value, the program has to react differently than when it is negative.
if someVariable > 0:
	# do something
else:
	# do something different
In Python, the if-else-statement is used to manage choices whether to do something at a certain point, or to do something else. The choice is always made on basis of an evaluation within the statement. Possible evaluations are as follows:
x == y # (x is equal to y)
x != y # (x is not equal to y)
x > y # (x is greater than y)
x <= y # (x is less than or equal to y)
x >= y # (x is greater than or equal to y)
The following partial example code evaluates whether a student has passed an exam. If students receive a mark higher than or equal to 5.5 he has passed the test:
if result >= 5.5:
	message = visual.TextStim(win, text="pass")
else:
	message = visual.TextStim(win, text="fail")
It is also possible to use the if-part without a following else-part. Here an example:
if temperature < 0:
	message = visual.TextStim(win, text="Frozen\ncold")
In this example the \n refers to a next line or a enter.
Each if-statement is actually a logical test. If the test is true, then the following line of code is executed. If the test is false, then the statement following the ‘else’ is executed (if present). After this, the rest of the program continues as normal.
Sometimes, we wish to make a choice out of several conditions. The most general way of doing this is by using the else if variant of the if-statement. This works by cascading several comparisons. As soon as one of these tests gives the result True, the following code is executed, and no further test is performed. In the following example grades are awarded depending on the result of an exam:
if result >= 7.5:
	message = visual.TextStim(win, text="Pass: Grade A")
elif result >= 6.0:
	message = visual.TextStim(win, text="Pass: Grade B")
elif result >= 5.5:
	message = visual.TextStim(win, text="Pass: Grade C")
else:
	message = visual.TextStim(win, text="Fail")
Assignment 3: Grades
As you have just read, Python works with variables and control structures. Both things are commonly combined, for example a loop that runs through all elements of a list. Or think of visual feedback, which depends on the value of a certain variable. Now, we will make a short program consisting of a list.
- Type the following experiment in the PsychoPy editor. You need not copy the comments. Save it and execute.
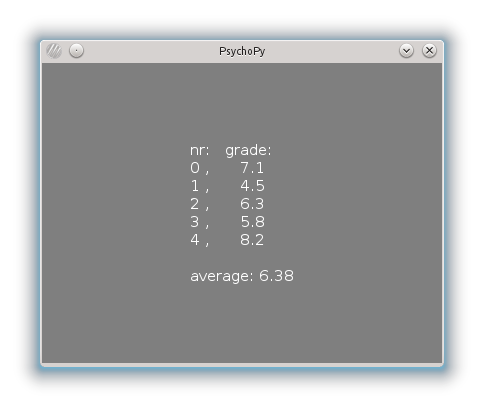
- Present the average grade on the screen. For calculating the average grade you can use: average = sum(grades)/len(grades). For adding a text to the myText string you can use myText += "\naverage: " + str(average). Where would this code go?
- Add a third column to the screen, indicating whether the student has passed or failed the test.
#!/usr/bin/env python
# -*- coding: utf-8 -*-
# A PsychoPy experiment is now divided in three sections. In the
# Setup section we read files and open windows. These things are slow
# and therefore should not be done while the experiment is running.
# in the Experiment section we do the actual presenting of stimuli
# en in the Closing section we do what has to be done after the
# experiment if finished.

## Setup Section
from psychopy import core, visual

win = visual.Window([400,300], monitor="testMonitor")

# The following block of code prepares a text stimulus called message
# a string variable contains text, it must be enclosed in quotation marks
myText = "nr:   grade:\n"
# a list variable contains a number of variables
grades = [7.1, 4.5, 6.3, 5.8, 8.2]
# do something for every item in the list
for studentNumber, grade in enumerate(grades):
	# extend the text with one line, "\n" tells PsychoPy to start en new line
	myText += str(studentNumber) + " ,      " + str(grade) + "\n"

# write myText to a TextStim object called message and draw this to the window
message = visual.TextStim(win, text=myText)
message.draw()

## Experiment Section
win.flip()
core.wait(5.0)

## Closing Section
win.close()
core.quit()
It should give you the following screen:
Continue with the next lesson