RuSocSci package
We make the RuSocSci package which connects to our buttonbox and joystick. It offers a PsychoPy-like interface The RuSocSci module works under Windows, Mac and Linux. Documentation can be found on the documentation server of the Python Package Index PyPI. Instructions for installation can by found on the installation under PyPI. Make sure you get the right instructions, one is for Linux, one is for Windows.
Example Scripts
Buttonbox
Press A on the buttonbox and look in the Console for output. If no buttonbox is connected, you will get an error message. Not that from version 0.7 onward, that api has changed and is now similar to that for the keyboard in PsychoPy.
#!/usr/bin/env python

# import the rusocsci.buttonbox module
from rusocsci import buttonbox

# make a buttonbox
bb = buttonbox.Buttonbox()

# wait for a single button press
b = bb.waitButtons()

# print the button pressed
print("b: {}".format(b))
The following script lights the LEDs under the buttons pressed.
#!/usr/bin/env python
import logging, time, sys
from rusocsci import buttonbox

## Setup Section
led = [False]*8
bb = buttonbox.Buttonbox()

## Experiment Section
while True:
	buttons = bb.getButtons()
	if len(buttons):
		for c in buttons:
			if ord(c) >= ord('a') and ord(c) < ord('a')+8:
				led[ord(c) - ord('a')] = False
			elif ord(c) >= ord('A') and ord(c) < ord('A')+8:
				led[ord(c) - ord('A')] = True
		bb.setLeds(led)
or for those who like bitshifting:
#!/usr/bin/env python
from rusocsci import buttonbox

bb = buttonbox.Buttonbox()
val = 0

while True:
	try:
		d = ord(bb.getButtons()[0]) # A-H for on, a-h for off, except on no input
		val |= 1 << d - ord('A') & 255 # turn on these bits
		val ^= 1 << d - ord('a') # turn off these bits, except on capitals
	except:
		pass
	bb.setLeds(val = val)
The following script shows how to use RuSocSci with PsychoPy. Note the similarity with using psychopy.event for keyboard events.
#!/usr/bin/env python

# import psychopy and rusocsci
from psychopy import core, visual
from rusocsci import buttonbox

## Setup Section
win = visual.Window(monitor="testMonitor")
bb = buttonbox.Buttonbox()
text = visual.TextStim(win, "Press a button on the buttonbox")

## Experiment Section
# show text
text.draw()
win.flip()
# wait for response
b = bb.waitButtons()
# show response
text.setText("you pressed: {}".format(b))
text.draw()
win.flip()
core.wait(5)

## Cleanup Section
core.quit()
Red Joystick
Move the joystick a bit after starting the script. You should see it output a number in the range 51-201. Make sure the joystick is in the upright position when starting the script. Note that if everything seems OK, but the getX() function always returns 126, then your joystick may have the wrong firmware. Please contact Pascal de Water.
#!/usr/bin/env python
from rusocsci import joystick, utils
import logging, time

## Setup Section
#logging.getLogger().setLevel(logging.DEBUG) # use this for debug info
#utils.serialList() # get alist of ports with a joystick or buttonbox connected
j = joystick.Joystick()
#j = joystick.Joystick(1) # use this to connect to the second joystick
#j = joystick.Joystick(port="COM1") # use this to connect to a joystick on a specific port

## Experiment Section
for i in range(15):
	print("x: {}".format(j.getX()))
	time.sleep(1)
FAQ
- It doesn't work
- Install the drivers. For most hardware the package depends on the FTDI VCP driver. For the newest hardware it depends on the Arduino driver. Driver installation is automatic in Linux. Driver installation is usually automatic in Windows.
- It still doesn't work
- Install the newest version of the software.
- It still doesn't work
- Explicitly name the port that the buttonbox is connected to. Replace
bb = buttonbox.Buttonbox()
with for instancebb = buttonbox.Buttonbox(port="COM1")
This also makes it possible to use rusocsci with multiple buttonboxes and joysticks. - Multiple buttonboxes do not work on the new lab computer
- That's right.
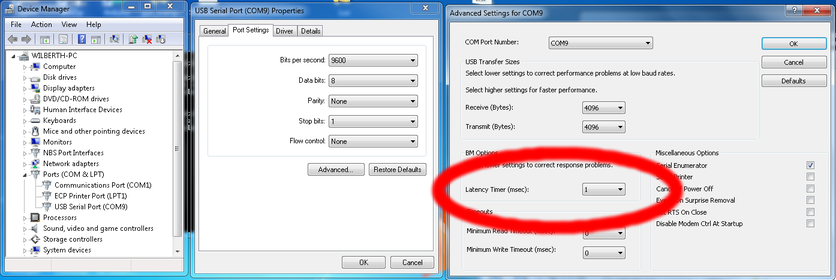
- Timing is poor on Windows
- Set the polling interval (Latency Timer) to 1 ms:
Respond to plugging in
You can execute actions open plugin of the hardware using udev rules (Linux only). Here are a few examples of lines that you could put in /etc/udev/rules.d/90-buttonbox.rules.
SUBSYSTEM=="usb-serial", ATTRS{idVendor}=="0403", ATTRS{idProduct}=="6001", RUN+="/home/wilberth/Documents/Python/RuSocSci/test/home/wilberth/bin/something.sh"
SUBSYSTEM=="tty", ATTRS{idVendor}=="0403", ATTRS{idProduct}=="6001", ATTRS{serial}=="A600etpL", SYMLINK+="myButtonbox"
SUBSYSTEM=="tty", ATTRS{idVendor}=="0403", ATTRS{idProduct}=="6001", SYMLINK+="buttonbox"
SUBSYSTEM=="tty", ATTRS{idVendor}=="0403", ATTRS{idProduct}=="6001", RUN+="/home/wilberth/Documents/Python/RuSocSci/test/knightRider.py"
Use
udevadm info -a -n /dev/ttyUSB? | grep '{serial}' | head -n1
to get the serial number of the last plugged in device. More
tips